

I still remember the first time I tried to “save money” by installing my own replacement window in my 1970s split-level. I figured: pop out the old one, set in the new one, done by dinner. What I learned the hard way is that pocket insert windows are forgiving in some ways, but they are absolutely ruthless about two things: a square opening and careful sealing.
If you have solid existing window frames (the old jambs and exterior trim are staying), a pocket insert can be a very DIY-friendly upgrade. This guide walks you through the full process so you can get a smooth-operating, tight-sealing window that looks like it belongs there.

Pocket insert vs full-frame
A pocket insert replacement window (also called an insert window) is designed to slide into your existing window frame. You keep the old jambs and usually the exterior trim. That makes it faster and less disruptive than a full-frame replacement, but it only works when the existing frame is still sound.
Good candidates for an insert window
- The existing jambs and sill are solid, not punky or crumbling.
- The opening is reasonably square and not twisted.
- You want to keep interior casing and exterior trim as-is.
- You do not need to resize the opening.
Skip inserts and consider full-frame if you see this
- Rot in the sill or lower jambs.
- Water staining that feels soft when probed.
- Big gaps, major racking, or visible settling.
- You want maximum glass area. Inserts slightly reduce glass size.
If you are still on the fence, my rule is simple: if you cannot confidently say the old frame is healthy, do not trap problems behind a new window. Start with our overview of replacement timing here: 7 signs it’s time to replace your home’s windows.
Tools and materials
Different brands vary, but most pocket insert installs use the same basic kit. If you have everything staged before you start, the install goes smoother and safer.
Tools
- Tape measure
- Level (2 ft and, ideally, 4 ft)
- Square or measuring diagonals (tape works)
- Utility knife
- Flat bar and small pry bar
- Screw gun or drill and bits
- Putty knife
- Hammer
- Caulk gun
- Oscillating multi-tool (optional but very handy)
- Shop vac and brush
Materials
- Insert replacement window (correct size and configuration)
- Shims (composite or cedar)
- Exterior-rated sealant (high quality, paintable if needed)
- Low-expansion window and door foam
- Backer rod (for large exterior gaps)
- Fiberglass insulation (optional, for small areas where foam is not appropriate)
- Flashing tape (only where it makes sense for your trim details)
- Wood filler or epoxy consolidant (for minor repairs only)
- Fasteners specified by the window manufacturer
Safety note: If your home was built before 1978, assume old paint might contain lead. Even if you are a homeowner (not a paid renovator), it is smart to use a HEPA vac, keep dust down, and follow EPA lead-safe practices. Here is the EPA overview: https://www.epa.gov/lead/lead-renovation-repair-and-painting-program.
Measure the opening
Manufacturers have their own measurement instructions. Follow your window’s paperwork first. If you do not have it in front of you yet, use this approach as a practical baseline for most insert windows.
1) Measure width in three places
Measure the inside width of the existing frame where the insert will sit, typically jamb-to-jamb:
- Top
- Middle
- Bottom
Write down all three. Use the smallest number.
2) Measure height in three places
Measure from the top jamb down to the high point of the sill (again, where the insert will sit):
- Left
- Center
- Right
Use the smallest number.
3) Check for square
Measure diagonals corner-to-corner both ways. If they are not close, the opening is out of square. A little out of square can be shimmed, but if you are seeing a big difference, slow down and decide if an insert still makes sense.
4) Plan your fit allowance
Most insert installs need a small perimeter gap for shimming and insulation. People often quote about 1/4 inch total clearance (roughly 1/8 inch per side), but this varies a lot by brand and by how the manufacturer expects you to order the unit.
My rule: do not “self-deduct” unless your manufacturer tells you to. Some companies want your exact opening size and they build the deduction into the order. Others give a specific clearance range. Either way, follow the instructions for your window.
Want a deeper cost reality check before you commit? I broke down the hidden costs and what usually surprises homeowners here: the true cost of window replacement.

Prep the old frame
Your goal is to create a clean, solid, square “pocket” for the insert window. Take your time here. Prep is where you prevent future drafts and sticky sashes.
1) Remove the interior stops
Most double-hung windows have thin interior stop molding that holds the lower sash in. Score paint lines with a utility knife first. Then pry slowly with a flat bar and a putty knife behind it to protect the trim.
If your sashes are painted shut, I have a full walk-through for freeing them without destroying the wood: how to unstick a painted or swollen double-hung window.
2) Remove sashes and old track parts
- Pull the lower sash out first.
- Remove parting stops (the thin vertical strips between sashes).
- Remove the upper sash.
- Remove old jamb liners, pulleys, or balance hardware if your insert system requires a bare wood pocket.
- If you have old weight pockets, secure cords and weights so nothing drops inside the wall, or follow the manufacturer’s steps for capping and insulating the pocket.
3) Inspect and repair the frame
Probe the sill and lower jambs with an awl or screwdriver. If it sinks in easily, you have rot that needs addressing before any install.
- Minor damage: scrape loose material, stabilize, and rebuild with exterior wood epoxy.
- Major rot: stop and consider a full-frame replacement or professional repair.
4) Clean and flatten the pocket
Vacuum debris. Scrape down bumps of old paint or caulk where the insert frame will sit. The insert needs consistent contact points so it does not twist when you fasten it.
5) Quick code check for tempered glass
If you are replacing a window in a hazardous location (for example, near a door, by a tub or shower, or low to the floor), check local code and your manufacturer specs for tempered safety glass requirements before you order.
Dry-fit the window
Before you run a single screw, test-fit the window.
- Place the insert into the opening from the interior.
- Center it left to right.
- Check that the exterior face (or blind stop contact area) lands evenly all around.
- Close and open the sash to confirm nothing is binding during the dry fit.
If it will not sit flush, find out why now. Common culprits are paint buildup, old nails, or a bowed sill.

Set and fasten
This is the heart of the job. The window needs to be level side to side, plumb up and down, and square so the sashes operate smoothly and the weatherstripping actually seals.
1) Shim the sill first
Set shims at the recommended support points, typically near the corners and under any mullions or meeting rails. Your goal is a level base that does not rock.
2) Insert the window and tack it in place
Slide the insert in, then add a couple of temporary shims on the sides to hold it centered. Do not fully fasten yet.
3) Check level, plumb, and square
- Level across the sill of the insert frame.
- Plumb both side jambs.
- Measure diagonals of the insert frame to confirm square.
4) Fasten in the right spots
Most insert windows fasten through pre-drilled holes in the jamb liners or through installation clips. Follow your manufacturer’s instructions. In general:
- Fasteners should land in solid wood framing, not just old liner material.
- Shim behind screw locations so you do not bow the frame when you tighten.
- Fasten one side lightly, then re-check plumb and square.
- Fasten the opposite side, adjusting with shims as you go.
- Do not overdrive screws. Over-tightening can bow the frame and make sashes bind.
5) Confirm operation before you commit
Open and close the sashes. Lock and unlock. The sash should move smoothly and the reveal gaps should look even. If something feels off, back out screws and adjust shims now, not after foam and caulk.
Insulate the gap
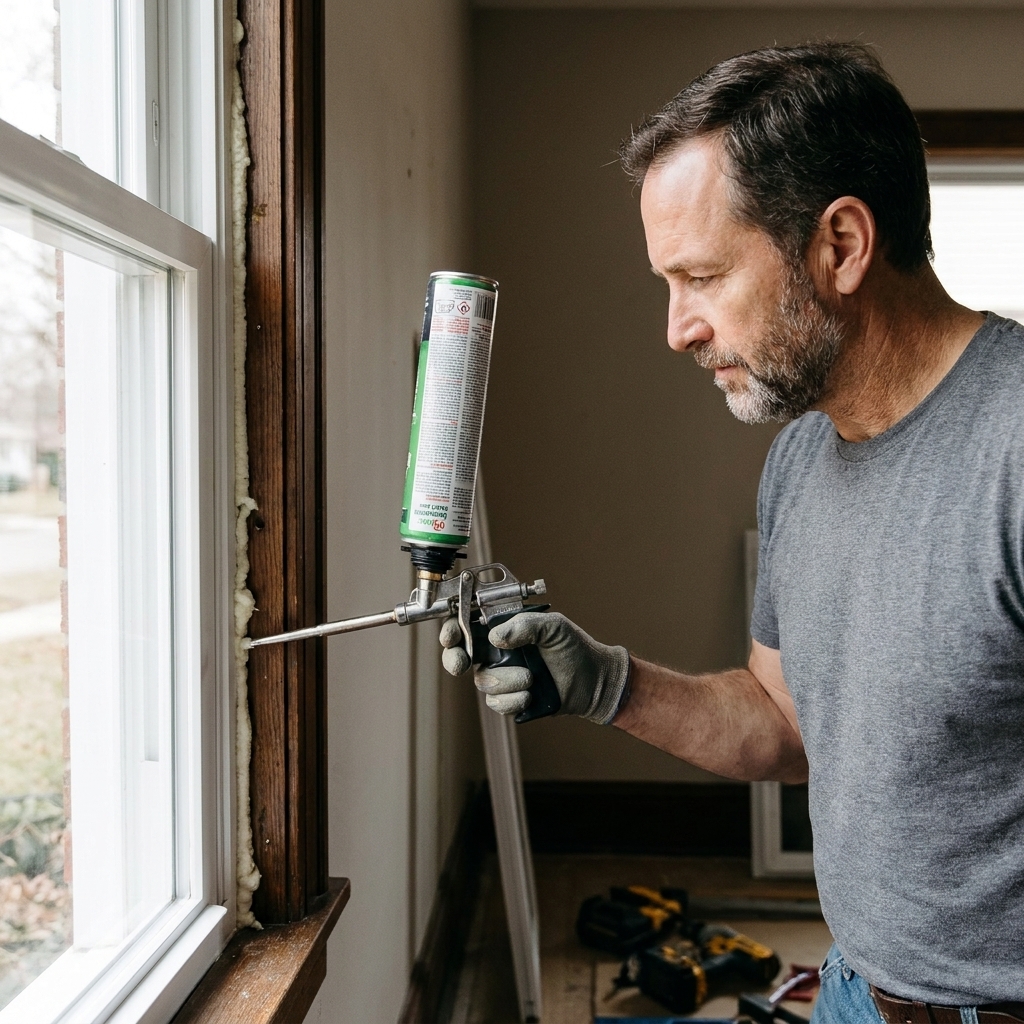
This is the part where DIY installs most often go wrong. Regular expanding foam can bow a window frame enough to cause sticking, air leaks, or a lock that no longer lines up.
Use low-expansion foam
- Use foam labeled for “window and door” applications.
- Apply in small beads, not one continuous heavy fill.
- Work in layers if needed, letting the foam expand and cure between passes.
Where foam is not ideal
If you have a very narrow gap, some installers prefer fiberglass pushed in gently. The key is: do not compress it tightly, or it loses insulating value.
Before you move on: once the foam cures, trim it flush. If your manufacturer calls for it, score and snap off exposed shims so you are not fighting them during trim and caulk.
If drafts were your main motivation, you might also like: weatherstripping vs caulking for drafty windows.
Exterior seal
Exterior sealing is what keeps bulk water out, and it is what makes an insert install feel “finished.” The details depend on your existing trim, siding, and how the insert interfaces with the blind stop.
Basic approach
- Inspect the exterior perimeter for gaps between the insert and the existing exterior stop or trim.
- If the gap is wider than about 1/4 inch, use backer rod first so the sealant has the right shape and depth.
- Apply a smooth, continuous bead of high-quality exterior sealant.
- Tool it so it makes solid contact on both sides.
Important: do not block drainage. Many window and trim details need a small drainage path at the bottom, and some designs have weep routes that must stay open. Avoid caulking across weep holes or sealing the entire bottom edge unless your manufacturer specifically says to.
Interior trim
Once the foam is cured and trimmed flush, reinstall your interior stops or add new ones if the old pieces are chewed up.
- Pre-drill to avoid splitting thin trim.
- Use finish nails sparingly.
- Caulk small interior gaps for a clean line, then touch up paint as needed.
If you want the simplest “clean and crisp” upgrade after the install, a good cleaning makes a bigger difference than people expect. Here is my method for getting exterior glass streak-free: how to clean second-story exterior windows safely and streak-free.
Final checks
I like to do these checks the same day, then again after the first cold snap or hard rain.
- Sash operation: opens, closes, and locks smoothly.
- Even reveals: gaps around the sash look consistent.
- No frame bow: sight down the jambs; they should be straight.
- Air leaks: on a windy day, feel around the perimeter.
- Water management: exterior sealant bead looks continuous and properly tooled, and any weep paths are still open.
Troubleshooting
The sash is hard to open or close
- Likely cause: frame is out of square or bowed from over-tightened screws or too much foam.
- Fix: back out fasteners slightly, re-shim, re-check diagonal measurements, then refasten gently.
The lock does not line up
- Likely cause: frame racked slightly during fastening.
- Fix: square the frame, then re-check lock alignment before final trim.
You feel drafts around the edges
- Likely cause: incomplete insulation or a missed interior air seal.
- Fix: carefully remove interior stop, add low-expansion foam or gently packed fiberglass, then re-caulk interior seams.
Condensation shows up after replacement
New windows are often warmer than old glass, but a tighter install can reduce air leakage and let indoor humidity rise. When that happens, condensation will show up on the coldest surfaces in the room, and windows are often near the top of that list on very cold nights. If you are seeing winter condensation, this guide will help you narrow down the cause: why windows sweat in winter and how to stop it.
When to call a pro
I love a solid DIY win, but there are times it is smarter to pause.
- You find rot that extends into structural framing.
- The opening is significantly out of square and cannot be corrected with shimming alone.
- You suspect water is getting behind siding or trim around the window.
- You are working on upper floors without safe access.
If you decide to keep researching the replacement route, our hub page is a good next stop: Window Replacement guide.
No-regrets tips
- Label your stops and trim pieces as they come off, especially if you are doing multiple windows.
- Do not trust your eyes for square. Measure diagonals and use a level.
- Fasten gradually. A window can look perfect until the last screw bows the jamb.
- Go easy on foam. Low-expansion only, and less than you think.
- Seal like water is your enemy because it is, and it is patient.
If you take your time, a pocket insert install is one of those projects that makes your house feel quieter, warmer, and newer in a single afternoon.