
Even if you never intend to use the command line, it would pay to become familiar with the Recovery Console. In the event of a problem getting Windows XP to boot, this command line facility might allow you to repair a corrupted system or to retrieve precious personal files. In FAT systems, a DOS boot disk can be used to access a system with problems but the NTFS systems that are now common cannot be accessed from DOS. As outlined on another page, various CD boot disks can be constructed that provide for emergency services either with Linux or special NTFS readers. However, Windows XP comes with its own accessory for this purpose. The Recovery Console will work with both FAT and NTFS formatted disks but is especially useful for systems with NTFS. It is not as well known as it should because Microsoft seems to want to keep it obscure and hard to use. In this article, I will try to clarify its usage and explain how it can help the average PC owner.
Accessing the Recovery Console with a Windows CD
Accessing the Recovery Console Without a Windows CD
Computer vendors very often do not provide a Windows disk with their systems. Instead they provide a Restore disk or just a hidden restore partition. They may provide a way to get into the Recovery Console but computer owners will have to check their particular setup. If, as is likely, the Recovery Console is missing there is another way to obtain it.
Microsoft provides software for creating a set of six diskettes for reinstalling Windows XP for those with no bootable CD.The details are here. It doesn't seem to be widely known but these disks also contain the Recovery Console. Thus creating this set of diskettes will give those without a Windows CD (but with a floppy drive) the option of using the Recovery Console. It is tedious; you have to wait while the system slogs through the setup process and loads all six disks but if it saves your system it will be worth it. Once you get to the Welcome Screen. the procedure is the same as with that with a CD described above.
If you have neither a Windows XP CD nor a floppy drive, there are methods for placing floppy disk images on a bootable CD. One easy way to create a bootable CD containing the Recovery Console from the Microsoft file mentioned above has been provided by Dean Adams and can be downloaded at this link.
Commands in the Recovery Console
Once you have opened the Recovery Console, what can you do with it?
Table I lists commands that are available. Many have switches. Details
about syntax and functions are available on a following page or can be obtained by entering {command} /?in
the Recovery Console. Details are also available on this
Microsoft page.
Note that the console has its own command interpreter and commands may
differ somewhat from those of the same name in a regular command prompt.
Also, in the default configuration, some commands are disabled or limited
in their functions. Removing some of the restrictions is discussed in
the next section.
| Command | Description |
|---|---|
| Attrib | Changes the attributes of a file or directory |
| Batch | Executes the commands specified in the text file |
| Bootcfg | Boot file (boot.ini) configuration and recovery |
| ChDir (Cd) | Displays the name of the current directory or changes the current directory |
| Chkdsk | Checks a disk and displays a status report |
| Cls | Clears the screen |
| Copy | Copies a single file to another location |
| Delete (Del) | Deletes one or more files |
| Dir | Displays a list of files and subdirectories in a directory |
| Disable | Disables a system service or a device driver |
| Diskpart | Manages partitions on your hard drives |
| Enable | Starts or enables a system service or a device driver |
| Exit | Exits the Recovery Console and restarts your computer |
| Expand | Extracts a file from a compressed file |
| Fixboot | Writes a new partition boot sector onto the specified partition |
| Fixmbr | Repairs the master boot record of the specified disk |
| Format | Formats a disk |
| Help | Displays a list of the commands you can use in the Recovery Console |
| Listsvc | Lists the services and drivers available on the computer |
| Logon | Logs on to a Windows installation |
| Map | Displays the drive letter mappings |
| Mkdir (Md) |
Creates a directory |
| More | Displays a text file |
| Rename (Ren) | Renames a single file |
| Rmdir (Rd) | Deletes a directory |
| Set |
Displays and sets environment variables |
| Systemroot | Sets the current directory to the systemroot directory of the system you are currently logged on to. |
| Type | Displays a text file |
Removing Console Restrictions
The default configuration of the console contains a number of limitations. I presume the rationale behind this is to limit the damage that the uninitiated might do. However, it greatly reduces the usefulness of the console. The restrictions include denial of access to any but a limited number of folders, inability to write to a floppy disk, and inability to use wild cards in commands. These restrictions can be removed by several methods. They are described in the next three sections. Note that these measures must be taken from a regular Windows logon with administrator privileges. They cannot be made from the Recovery Console itself.
Using the Group Policy or Security Policy Management Consoles
This method is open to Windows XP Professional users only and involves
a section of the Group Policy Editor called Local Security
Settings. A description
is given at this Microsoft
article but it is not a
model of clarity. ( Microsoft instructions in this area are confusing in general.)
There are two possible management
consoles that can be used, the Group Policy
editor gpedit.msc or its subsection secpol.msc (See this
reference for a discussion
of management consoles.) The simplest way is to open the Local Security
Settings console by entering secpol.mscinto Start-Run.
Then click "Local Policies-Security Options" in the left pane. In the
list that appears in the right pane find, Recovery
Console: Allow Floppy Copy And Access To All Drives And Folders, and double-click
it. The box shown in the figure below will open. Click the button "Enabled"
and then "OK"
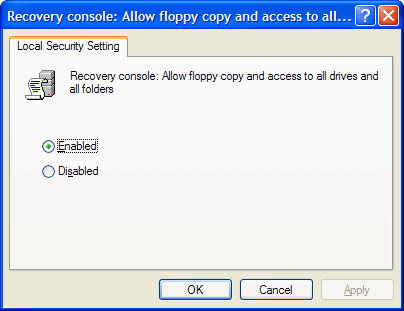
The name of this setting is misleading. There is more involved than enabling writing to a floppy or access to all folders. What this actually does is to give you permission to use the "Set" command within the Recovery Console. This command is discussed later and is what is actually used to remove restrictions.
Editing the Registry
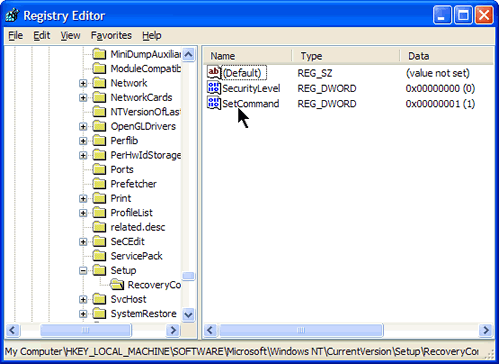
The procedure described above works by changing an entry in the Registry. If you are familiar with Registry editing, direct editing is another route and it has the advantage of being available to those with the Home Edition of Windows XP. Open regedit and find HKEY_LOCAL_MACHINE\Software\Microsoft\Windows NT\CurrentVersion\Setup\RecoveryConsole\. In the right pane, this key will have an entry "SetCommand". Put a value of 1. This is shown in the figure below. Be sure to back up the Registry before doing any editing.
A script for doing the Registry edit
Editing the Registry is not an activity for everyone. For the benefit of those who are uncertain about editing the Registry themselves, I have created a small script that will make the Registry change for you. For this script, I have chosen the INF format. You may be familiar with INF files since they are the standard way to install drivers. Click here to download setcommand.inf (zipped). Before using it, back up the Registry or make a Restore Point. Unzip the file anywhere that is convenient and then right-click once to open the context menu. Click the menu item "Install". That's all there is to it. Now your Registry has been edited. Do not use this file on Windows 98/Me systems.
Using the "Set" Command
The Registry edit discussed in the sections above does not actually allow
you any new functions until one more step is done within the the Recovery
Console itself. The Registry edits do not make changes. They give you permission to
make changes using the "set" command. Those who are familiar with
the regular command line will be familiar with using "set" and
environment variables. (More on this subject can
be read here.) The capacities of the Recovery Console can be expanded
with four "set" commands. The first allows access to all files
and folders on the main system. In the Recovery Console prompt enter set
AllowAllPaths = true The second command allows you to copy files to
removable media like floppy disks. Enterset AllowRemovableMedia
= trueThe next command allows you to use wildcards in commands like
"dir" and "del".
Enterset AllowWildCards = true Finally, there is a command that
allows you to copy files without being prompted to continue when you
are overwriting an existing file. Enterset NoCopyPrompt = true There
must be a space before and after the "equals" sign in all the set commands
or they won't work. The commands are not case-sensitive.
The One Command to Learn
If you learn no other commands to use in the Recovery Console, learn this:chkdsk C:
/rThere is more than one report on the Web of how this command
fixed a system that wouldn't boot. If you are using the console from
the floppy disk installation, chkdsk will complain that
it can't locate the file autochk.exe. When it asks for that file's
location, point it to \windows\system32. This command will thoroughly examine your hard drive and is not a fast process so give it time.